I used to do this in a production environment, for a large furniture factory, and would like to pass along what I remember from those days (mid-1980's.) This is all concerning carbide tipped saws use for cutting wood. Some of this assumes that you've aquired grinding equipment, but have not done any saw grinding before.
Woodworking saws will have hook (or “rake”) angles that vary from about -5 degrees to about +20 degrees or sometimes more. You never know, when you first get a saw, exactly what the hook angle is, or was intended to be. Often a previous saw guy will have ground it poorly, and you have to decide whether to try to follow his work or try to get it back to the original specs. The face of the tooth should always be parallel with the back.
To grind the faces, you'll need to determine the hook angle. I'm assuming you have an attachment for your grinder that will adjust for various saw diameters and also allow you to swing the saw around to adjust the hook angle. You'll need a flat plate that fits on your grinder in place of the diamond wheel. I made mine from the aluminum body of an old worn-out diamond wheel. Put it on a metal lathe and machine a flat on the face (where the abrasive would otherwise be) that is, say, ¼ to 3/8” wide. Or you can mount the wheel on the grinder, spin it up, and machine the flat in situ, with a sawblade clamped in place just like you were going to grind it. Use one of the carbide tips to machine the aluminum wheel body. Wear hearing protection; it will screech a lot.
To determine the hook angle, mount this set-up wheel on the grinder, put the blade to be sharpened on the blade holder, bring a tooth face against the index finger, clamp the blade, drop the finger out of the way, and carefully bring the blade up to the set-up wheel (the wheel is NOT turning,) tweaking it into position so that you can see with a magnifier if the tooth face is parallel to the machined face of the wheel. Adjust accordingly until the tooth face and the wheel face are as close to parallel as you can get them. Make a note of the hook angle.
Now you can replace your set-up wheel with a grinding wheel and start grinding the faces, taking off no more than .001” per pass, preferably a bit less. Make one pass on each tooth face, all the way around the blade, then if needed start another round. How many rounds you need to make depends on how dull the blade is. Don't try to get all at one time, the blade, blade holder, and grinding wheel will find a way to flex and give a bad, un-flat grind. There is a definite limit to the volume of carbide that any particular grinding wheel can remove in a given amount of time. Try to take off more than that, and something has to flex, or break, or overheat to the point of damage.
Take about half of the worn edge off by face grinding, and get the rest of it when you top grind.
Remember that a degree or two one way or another from the original factory grind will never be noticed...it just doesn't matter as far as the cutting action goes regardless of all the advertising crap that the blade sellers will tell you. But it's important to stay as close as you can to grinding parallel to the BACK of the tooth, to maximise tooth life. You'll need to obtain some special, thin rimmed diamond wheels to do the faces of saws with a lot of teeth, as the space in the gullet can get pretty tight.
Setting up to grind the tops of the teeth is about the same, except that you have a much smaller area of carbide to try to line up to the set-up wheel. You can fake it here, though. 8 to 10 degrees top clearance will work for just about every wood cutting situation. You need more clearance in wood cutting saws than in metal cutting saws, because the wood fibers spring back a bit after the edge passes, and will rub and cause heat build up. But too much clearance simply makes the cutting edge weak and the saw will dull more quickly. If you must go down to about 5 – 6 degrees to keep from grinding the steel behind the tooth, that won't really hurt anything. Less than that and the tips will quickly gum up behind the cutting edge and create more heat.
Side grinding is the hardest part to do. You don't have much room between the tooth you're grinding, the teeth in front of and behind it, and the saw plate. If you don't have a double side grinder, which does both sides of the tooth simultaneously, you have to set up a very rigid system to keep the blade from flexing as the grinding wheel tries to push the tooth away. Some machines are designed to flat grind the sides, others do a hollow grind. Some grindermen prefer one way, some the other, and it gets argued endlessly. I don't care. It's still a pain without special equipment. My experience is solely with a double side grinder that did hollow grinds. We used 1/2 to 2 degrees of radial clearance, and 2 degrees of tangential, if my memory is correct. Radial clearance is where the top of the tooth is wider than the bottom, tangential clearance is where the face of the tooth is wider than the back. It's important to keep the tooth ground so that it is exactly centered on the plate, and to have all the teeth the same width.
One problem with hollow grinding the sides is that, as you progressively grind the faces, you lose some tangential clearance until you need to re-grind the sides whether you want to or not.
Our practice was to run a sharpening cycle, thus: 1. Face grind. 2. Face and top grind. 3. Face grind. 4. Face, top and side grind. Repeat the cycle until the blade needs to be re-tipped. Ideally you should run out of thickness to face grind at the same time you run out of room to top grind and side grind. It never quite works out that neatly in practice. Remember too that as you face grind, not every tooth will be ground exactly the same no matter how careful you are or how accurate your machinery. Differences in the amount taken off of the faces will eventually make some of the teeth higher than others. Top grinding will bring them all back into the same cutting circle, and the saw will cut better. The same holds true, but to a lesser extent, with side grinding.
I had a log book of every blade in the factory, (a couple hundred or so) and kept running entries of everything we did to every blade. The log book included info on the serial number, blade diameter, plate thickness, bore, number of teeth, hook, top, and side clearance angles, and which machine / operator it was released to, run time, problems, etc., plus our service to the saw, such as grinding, tooth replacement, retipping, outside work, etc. If you are sharpening saws for the public, this may be pointless, but on the other hand if you have repeat customers or sharpen all of your own blades, it may save a lot of time and money. At the very least, when you finish a saw, take an engraver and write the specs on the blade, down close to the bore where it won't get polished off.
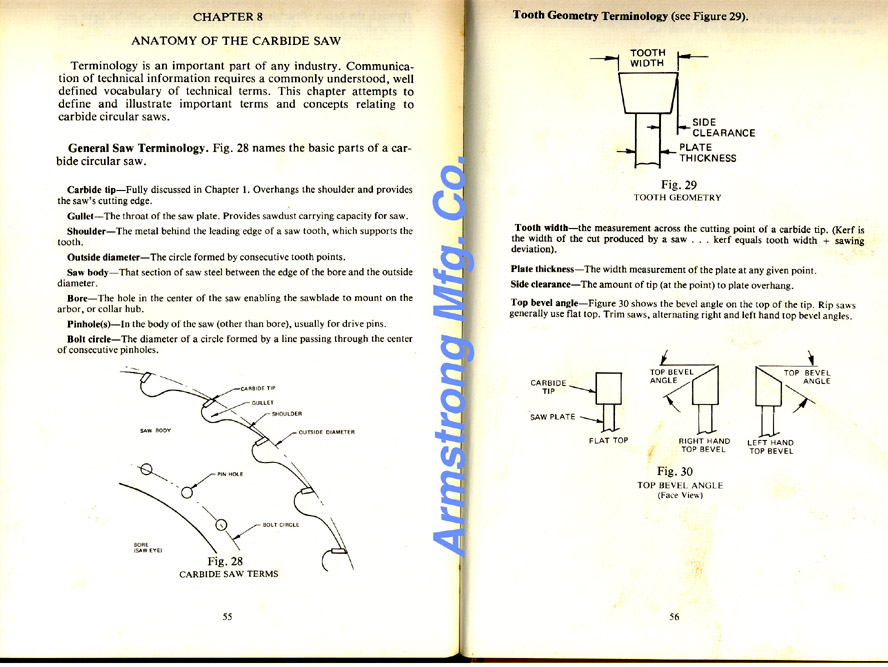
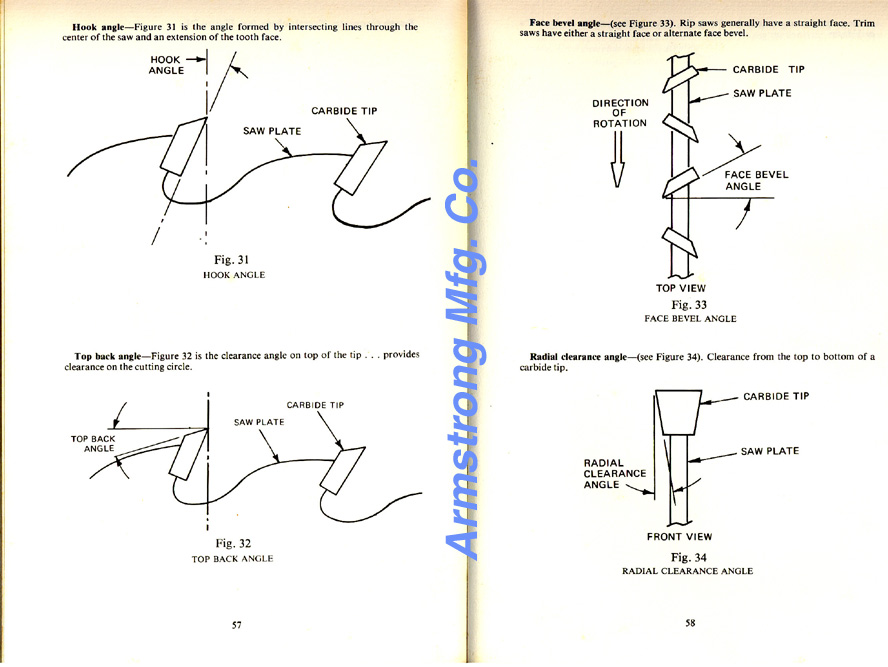
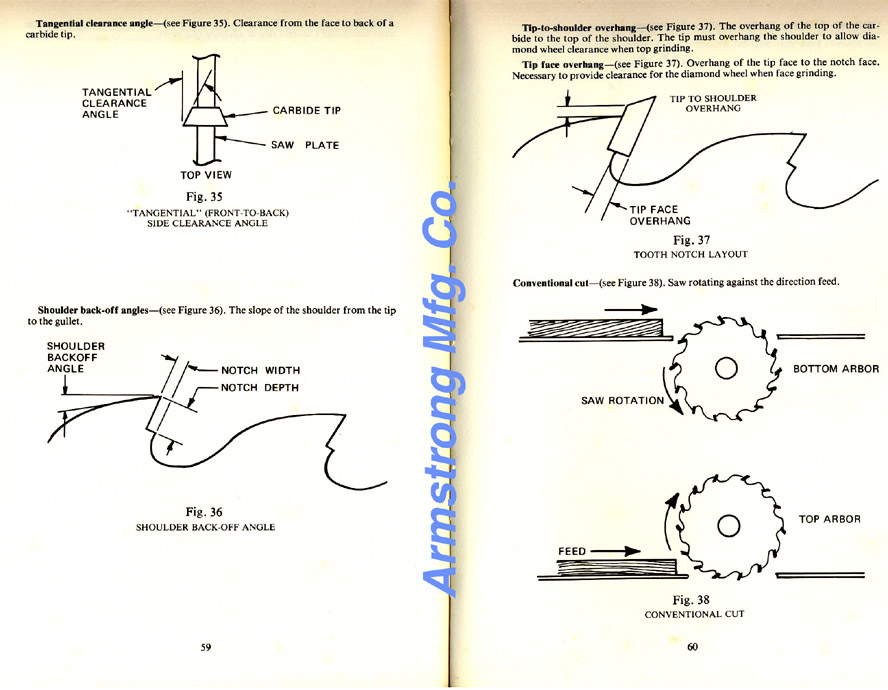
Below are three scans of explanatory drawings from “Armstrong Carbide Filer's Handbook” by Jeff Hewitt, posted with the kind permission of Armstrong Manufacturing Co. This book is a good source for info on carbide saw grinding, terminology, etc. and is available from Armstrong's website. It's targeted more for the sawmill industry, but has a lot of good info that can be applied to smaller saws too.
The Hanchett Saw And Knife Fitting Manual is available from Hanchett Manufacturing. It also targets the sawmill industry, but has an excellent discussion of saw plate stresses, hammering, leveling and tensioning.
Usual disclaimers apply...I'm not connected with either of these companies in any way.
The two drawings below show the importance of face and top grinding together, as opposed to face grinding alone. The drawings are not exactly to scale, and for clarity I've greatly exxagerated the amount of wear. Starting with a new, sharp tip shown in blue, I've drawn in a magenta radius to depict the wear. In order for the saw to be sharp, this radius must be completely ground away. The red lines show the successive grinds.
On the left, I've shown how much material must be removed from the face in order to remove the wear. In a real life situation, you could only grind off a little more than half to two thirds of the thickness of the tooth before it became to thin to support itself above the shoulder of the saw plate.
In the right hand drawing I've used exactly the same wear radius, but I've taken half of it off of the face and half off the top. Notice how many more grind cycles we get. In addition, we can now grind the tooth even thinner because there is progressively less carbide left unsupported up above the saw plate.

Thanks for the opportunity to pass along some of my experiences. I hope this information will be of some help in understanding good saw grinding practice. If I've only managed to confuse you with all this, let me know and I'll be pleased to confuse you a bit more.